One of the biggest caveats to leveraging the Microsoft Identity Platform for authentication and authorization purposes in your applications will be to get your app registrations verified. In fact, setting up app registrations for anything that’s not internal without verification will prompt administrators to have to grant tenant-wide admin consent for your application to be used within their tenant. Even with verification enabled, tenants can still require admin consent depending on their settings. Ultimately it’s best practice to get your apps verified though, as this adds a layer of trust with possible customers and Microsoft in between.
The process of getting verified isn’t difficult at all if you’re working in an organization with one Azure tenant. In fact, it’s as simple as having that tenant added to your Microsoft Partner Center account and getting the MPN ID approved.

However, as soon as you work across different tenants you’ll notice Microsoft does not support verifying app registrations with your MPN if your custom domain of the tenant does not match the custom domain of your MPN ID. If you want app verification in a secondary or third tenant, you’ll need to follow these pre-requisites:
- Ensure your MPN ID is verified to allow app registration verification. Instructions here.
- Add the Azure / Entra ID tenants where you want verification to your MPN ID. Instructions here.
- Have a local account on the designated tenant (with enough rights) that you can use to verify your MPN. For some reason, working with a B2B account (even if global admin!) does not allow you to add in your MPN ID.
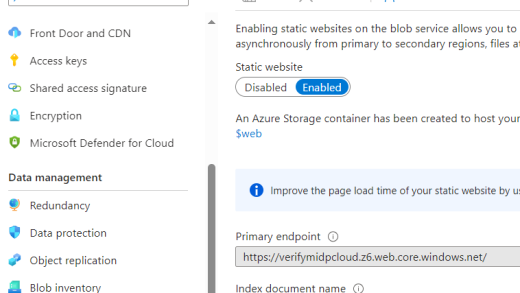
- Ensure you have a way to upload .json files on your main domain that matches your MPN ID. Tip: I wrote a blog post on how to leverage Azure Storage Accounts & static websites for this.
If you’ve ticked all these boxes, you now have to go the app registration page itself. Microsoft introduced the Entra portal recently which has an entire section dedicated to App Registrations. Head over to the app you want verified (make sure you’re logged in with that local account) and select Branding & Properties, from where you first want to update the Publisher Domain:

Because we can’t use the main domain of our MPN on this secondary tenant, we’ll want to Verify a new domain without adding it as a custom domain. Enter the publisher domain, download the .json file and make it available on the proposed /.well-known/microsoft-identity-association.json path:

Once we’ve uploaded the file (Tip: I wrote a blog post on how to leverage Azure Storage Accounts & static website for this) we can click Verify and save domain. You’ll notice the publisher domain is updated, all we have to do now is add our MPN ID:

Take note of the prerequisites mentioned above and in below screenshot, and add your MPN ID number in the dialog:

You’ll notice your MPN ID adds successfully, but publisher display name will most likely show a blue tickbox and – as shown below.

This is simply a caching issue that will resolve itself after a minute or so.
And that’s it! You’ve successfully verified an app registration with your main MPN ID on a secondary Entra ID tenant. End users will no longer need their admins to grant consent for you to leverage their identities in your application.
Finding this myself took a lot of google-fu. Even with highest tier of MS enterprise support, direct contact with engineers from both MPN department and leading level 3 engineers from Entra ID, I had to find the workaround myself. Hopefully this blog helps people in the same process as me.